Visualization
Software Available
We have installed the latest versions of the open source visualization suites: VMD, VisIt and ParaView.
Notice that for using ParaView you need to explicitly specify one of the mesa flags in order to avoid trying to use openGL, i.e., after loading the paraview module, use the following command:
paraview --mesa-swr
Notice that Niagara does not have specialized nodes nor specially designated hardware for visualization, so if you want to perform interactive visualization or exploration of your data you will need to submit an interactive job (debug job, see [[1]]). For the same reason you won't be able to request or use GPUs for rendering as there are none!
Interactive Visualization
Runtime is limited on the login nodes, so you will need to request a testing job in order to have more time for exploring and visualizing your data. Additionally by doing so, you will have access to the 40 cores of each of the nodes requested. For performing an interactive visualization session in this way please follow these steps:
- ssh into niagara.scinet.utoronto.ca with the -X/-Y flag for x-forwarding
- request an interactive job, ie. debugjob this will connect you to a node, let's say for the argument "niaXYZW"
- run your favourite visualization program, eg. VisIt/ParaView module load visit visit module load paraview paraview --mesa-swr
- exit the debug session.
Remote Visualization -- Client-Server Mode
You can use any of the remote visualization protocols supported for both VisIt and ParaView.
Both, VisIt and ParaView, support "remote visualization" protocols. This includes:
- accessing data remotely, ie. stored on the cluster
- rendering visualizations using the compute nodes as rendering engines
- or both
VisIt Client-Server Configuration
For allowing VisIt connect to the Niagara cluster you need to set up a "Host Configuration".
Choose *one* of the methods bellow:
Niagara Host Configuration File
You can just download the Niagara host file, right click on the following link host_niagara.xml and select save as... Depending on the OS you are using on your local machine:
- on a Linux/Mac OS place this file in
~/.visit/hosts/ - on a Windows machine, place the file in
My Documents\VisIt 2.13.0\hosts\
Restart VisIt and check that the niagara profile should be available in your hosts.
Manual Niagara Host Configuration
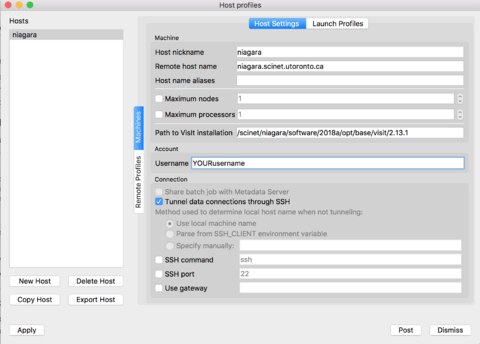
If you prefer to set up the verser yourself, instead of the configuration file from the previous section, just follow along these steps. Open VisIt in your computer, go to the 'Options' menu, and click on "Host profiles..." Then click on 'New Host' and select:
Host nickname = niagara
Remote host name = niagara.scinet.utoronto.ca
Username = Enter_Your_OWN_username_HERE
Path to VisIt installation = /scinet/niagara/software/2018a/opt/base/visit/2.13.1
Click on the "Tunnel data connections through SSH", and then hit Apply!

|
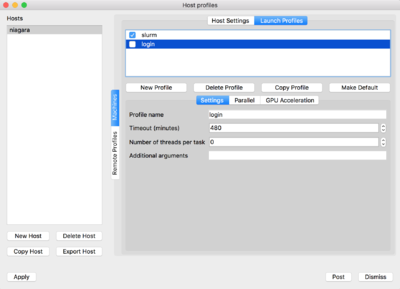
Now on the top of the window click on 'Launch Profiles' tab.
You will have to create two profiles:
-
login: for connecting through the login nodes and accessing data -
slurm: for using compute nodes as rendering engines
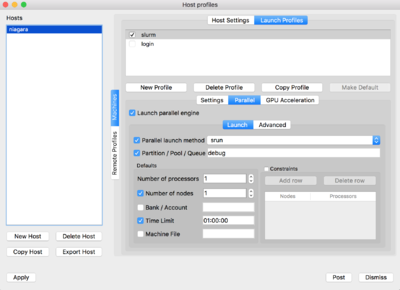
For doing so, click on 'New Profile', set the corresponding profile name, ie. login/slurm. Then click on the Parallel tab and set the "Launch parallel engine"
For the slurm profile, you will need to set the parameters as seen below:

|

|
Finally, after you are done with these changes, go to the "Options" menu and select "Save settings", so that your changes are saved and available next time you relaunch VisIt.
ParaView Client-Server Configuration
Similarly to VisIt you will need to start a debugjob in order to use a compute node to files and compute resources.
Here are the steps to follow:
- Launch an interactive job (debugjob) on Niagara, debugjob
- After getting a compute node, let's say niaXYZW, load the ParaView module and start a ParaView server, module load paraview pvserver --mesa-swr-ax2 The
- Now, you have to wait a few seconds for the server to be ready to accept client connections. Waiting for client... Connection URL: cs://niaXYZW.scinet.local:11111 Accepting connection(s): niaXYZW.scinet.local:11111
- Open a new terminal without closing your debugjob, and ssh into Niagara using the following command, ssh YOURusername@niagara.scinet.utoronto.ca -L11111:niaXYZW:11111 -N this will establish a tunnel mapping the port 11111 in your computer (
- Start ParaView on your local computer, go to "File -> Connect" and click on 'Add Server'.
You will need to point ParaView to your local port
11111, so you can do something like
name = niagara
server type = Client/Server
host = localhost
port = 11111
then click Configure, select - Once the remote server is added to the configuration, simply select the server from the list and click Connect.
The first terminal window that read
Accepting connection...will now readClient connected. - Open a file in ParaView (it will point you to the remote filesystem) and visualize it as usual.
--mesa-swr-avx2 flag has been reported to offer faster software rendering using the OpenSWR library.
localhost) to the port 11111 on the Niagara's compute node, niaXYZW, where the ParaView server will be waiting for connections.
Manual and click Save.
Multiple CPUs
For performing parallel rendering using multiple CPUs, pvserver should be run using srun, ie. either submit a job script or request a job using
salloc --ntasks=N*40 --nodes=N --time=1:00:00
 module load paraview
 srun pvserver --mesa
Final Considerations
Usually both VisIt and ParaView require to use the same version between the local client and the remote host, please try to stick to that to avoid having incompatibility issues, which might result in potential problems during the connections.
Batch mode and Scripting
Both, VisIt and ParaView, allow for batch processing using scripting in different languages.
VisIt
In order to run or launch the Python interpreter for VisIt, you will need to execute the following command:
visit -cli -no-win -norun engine_par
the 'engine_par' flag is needed in order to run the visualization engine in parallel. In addition to that you should add to your script the following line
OpenComputeEngine("localhost", ("-l", "srun", "-np", "40"))
In order to execute scripts you can instead run them in batch mode by executing,
visit -cli -no-win -norun engine_par scriptName.py
recall to add the OpenComputeEnigne(...) line to your script for using parallel processing.
References:
https://www.visitusers.org/index.php?title=ParallelPorting#Making_sure_you_actually_have_a_parallel_engine
https://www.visitusers.org/index.php?title=VisIt-tutorial-Python-scripting
https://www.visitusers.org/index.php?title=Python_examples
https://www.visitusers.org/index.php?title=VisIt-tutorial-Advanced-scripting
ParaView
ParaView offers a python interpreter pvbatch to use
pvbatch --mesa-swr-avx2 --force-offscreen-rendering scriptName.py
References:
https://www.paraview.org/Wiki/ParaView_and_Batch
https://www.paraview.org/Wiki/ParaView/Python_Scripting
Other Versions
Alternatively you can try to use the visualization modules available on the CCEnv stack, for doing so just load the CCEnv module and select your favourite visualization module.